This post explains the general structure of an Azure DevOps Build Pipeline, respectively an Azure DevOps Release Pipeline and how they differ from one another
Differentiating to Azure DevOps Server 2020
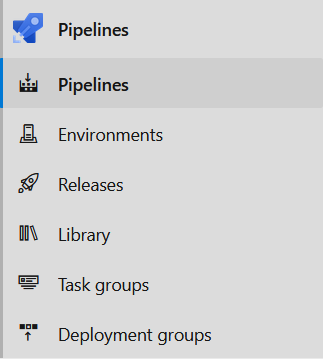
The content of this post refers to the Azure DevOps Server 2019 - be aware that the Build Pipeline, (shown as Builds within the SideBar) was renamed to Pipelines - see picture below:
Introduction
For several years, I’ve realized CI/CD implementations within TeamCity, which worked well IMHO. In TeamCity, you are able to use the concept of a Build Configuration: you can add multiple tasks within it, starting from the check-out of a Source Control Repository like Git and tasks used for e.g.: building your solutions, running tests, triggering commands with the command line, etc. Furthermore, you can link multiple Build Configurations to a Build Chain, defining among others dependencies and deployment conditions. Everything necessary to get the source builded, tested and the resulting Artifacts deployed at different platforms was covered by setting up several Build Configurations and linking them. After a few years, I switched from TeamCity to the Team Foundation Server of Microsoft (and during the last years a migration to the Azure DevOps Server 2019 was done) and as you can image, this posed some different concepts and their resulting challenges. Instead of a Build Configuration I had to use a Pipeline. But, there are to different ones: Build Pipeline, respectively Release Pipeline. To be honest, I was confused at the starting point why there were two different options.
Proof of the pudding is in the eating: I don’t know how often I did a re-design of my implementations, but at least I’d assume I got the idea according to how to use the different pipeline concepts of the Azure DevOps Server. This post is intended to explain the general structure and usage of the Build Pipeline, respectively the Release Pipeline for those who are new the Azure DevOps Server. Of course I don’t claim that the content of this post equals best practice, but it worked out to me and maybe it could be helpful when you need to migrate from Jenkins, TeamCity, or alternative Continuous Integration Server or Platform Tools to the Azure DevOps Server.
The structures of the Build Pipeline, respectively the Release Pipeline, which are shown in the pictures below will be explained in detail, how they differ from one another - and - of course the link between them.
Example of a simple Build Pipeline
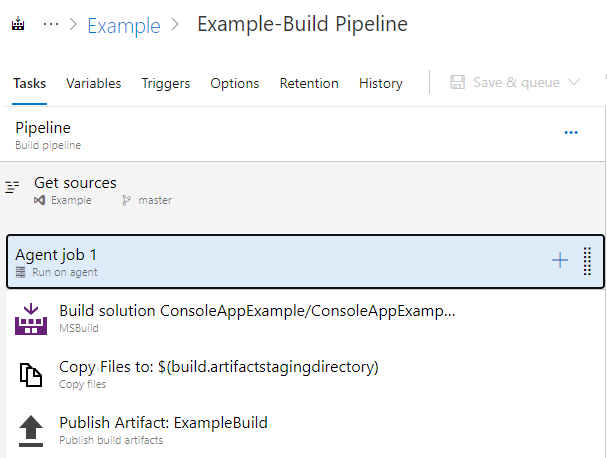
versus:
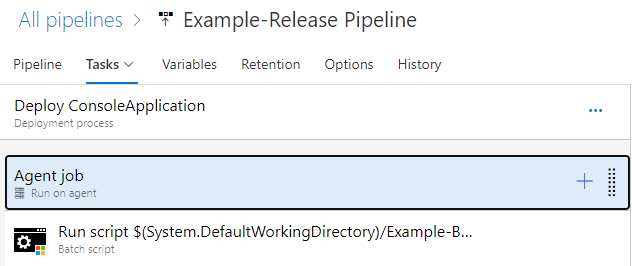
Example of a simple Release Pipeline
The simple Console Application written in C# below is used within simple examples of a Build Pipeline and the related Release Pipeline. It just prints provided arguments. According to my used configurations, the Artifact ConsoleAppExample.exe is created after building.
using System;

namespace ConsoleApp1
{
    class Program
    {
        static void Main(string[] args)
        {
            Console.WriteLine("Hello guest of my blog!");

            // Print provided arguments
            foreach(string argument in args) {
                Console.WriteLine("Argument: " + argument);
            }
        }
    }
}
1. Build Pipeline: From Source Code to publishing an Artifact
You’d use a Build Pipeline if you would like to generate an Artifact out of Source Code. Within .NET context this would mean e.g.: to get an .exe-file out your C# Source, for example the mentioned C# snippet. Imagine you’d like to set up a simple Build Pipeline for this snippet, then a basic implementation for that would consist of following steps:
- Check-out the Source: Define from which Repository of a Version Control System you’d like to get the sources
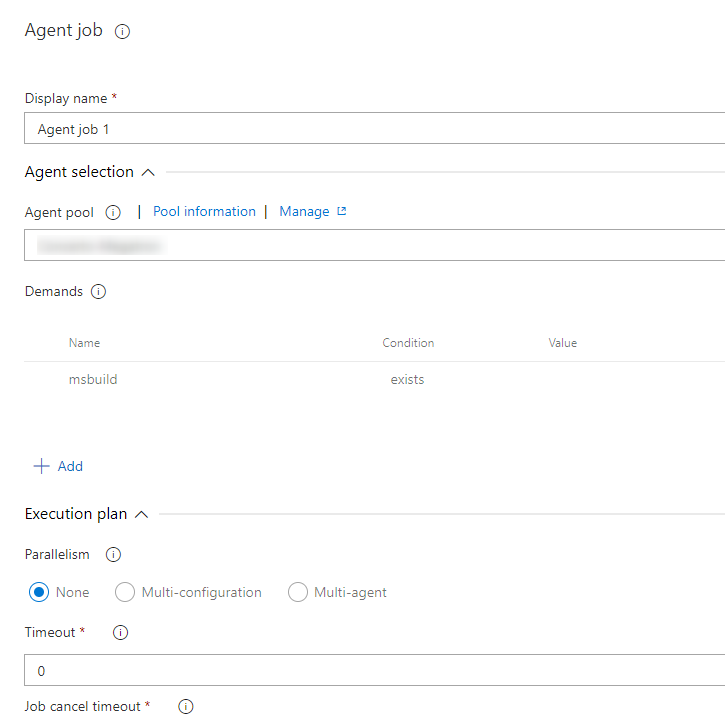
- Agent Job Settings: Set a dedicated Agent pool for your pipeline and determine Demands to ensure that a proper Agent will be choosen, containing the mandatory requirements.
- Build the Solution: Build your .NET application with dedicated Build Tools like MSBuild or Visual Studio Build
- Prepare Artifacts to be published (optional): Move/Copy the resulting files, e.g.: the .exe-file, to a specific directory, which intention is to publish all available files of the directory. In case of the Azure DevOps Server it is the Artifact-Staging-Directory - a corresponding pre-defined Environment Variable already exists.
- Publish the Artifacts Publish your Artifacts, e.g.: the .exe-file - make it possible to download them and providing them for follow-up jobs, derived by triggering e.g.: a Release Pipeline.
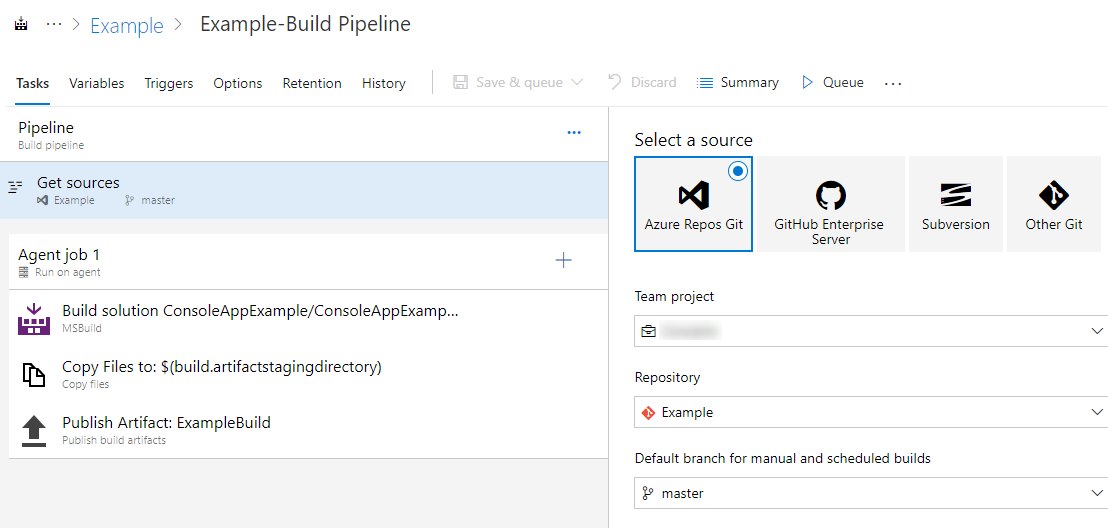
1.1 Define Source of the Build Pipeline
The Azure DevOps Server offers integration of multiple Version Controls Systems. Within this example, the source of the C# snippet is versioned within an Azure Repo. By default, the master branch is suggested to be used. Therefore, for each new job of the Build Pipeline the latest sources will be checked out at the Build Agent - the Agent will be selected within the Agent Pool according to the Demand Settings.
1.2 Agent Job Settings
From my point of view, it would be the best approach, if a proper Build Agent is assigned to the derived running job of the pipeline according to the existing prerequisites, e.g.: the availability of the corresponding Build Tools, like Visual Studio 2019 Build Tools or CMake, etc. In our example, a Build Agent has to be choosen, which contains a MSBuild.
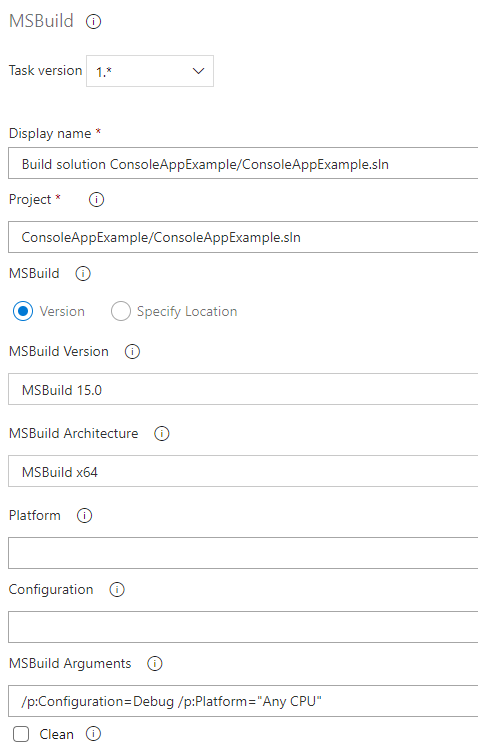
1.3 Build the Solution
Now it’s time to build the solution: I like to use the MSBuild task for building Visual Studio Solutions, but of course the Visual Studio Build fits also well.

Provide the path to the Solution file, define the MSBuild Version - be aware of the corresponding .NET Version compatibility - the MSBuild Architecture and furthermore set proper MSBuild Arguments: in our example I’ve choosen Debug and Any CPU for the Platform.
1.4 Prepare Artifacts to be published (optional)
While processing a job of a Build Pipeline, many files are getting created. Those ones, which should be available to be downloaded or post-processed are moved to a specific directory - the Artifact Staging Directory.

I’ve marked that step as optional as it’s IMHO of course not mandatory to do that. I’ve followed that approach, because after that step, the final step - the Publish Artifact step - just collects every file inside of that direcory and publishs it.
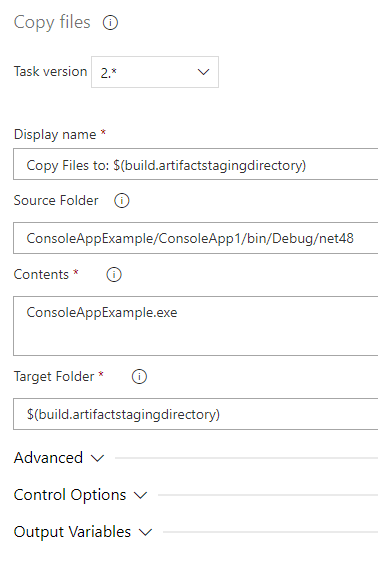
Note: there exists two equal pre-defined variables for that - don’t be confused. For further information see Build.StagingDirectory and Build.ArtifactsStagingDirectory are the same directory
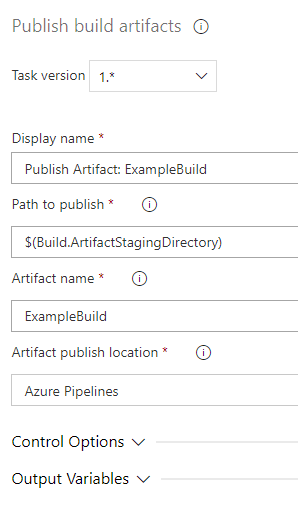
1.5 Publish the Artifacts
Finally, you’d like to publish the generated Artifacts, e.g.: the resultung .exe-file. It’s an important step, to make the Artifact available for post-processing: e.g.: it serves as “input” for a Release Pipeline.

So you generate the Artifact by using the Build Pipeline, but after that you’re of course not at end, as you would like to among others deploy and test your generated Artifact - in that example the ConsoleAppExample.exe. Provide an Artifact Name, you can use that name when you’d like to refer to the generated Artifacts within a Release Pipeline - see related sections of the Release Pipeline for that.
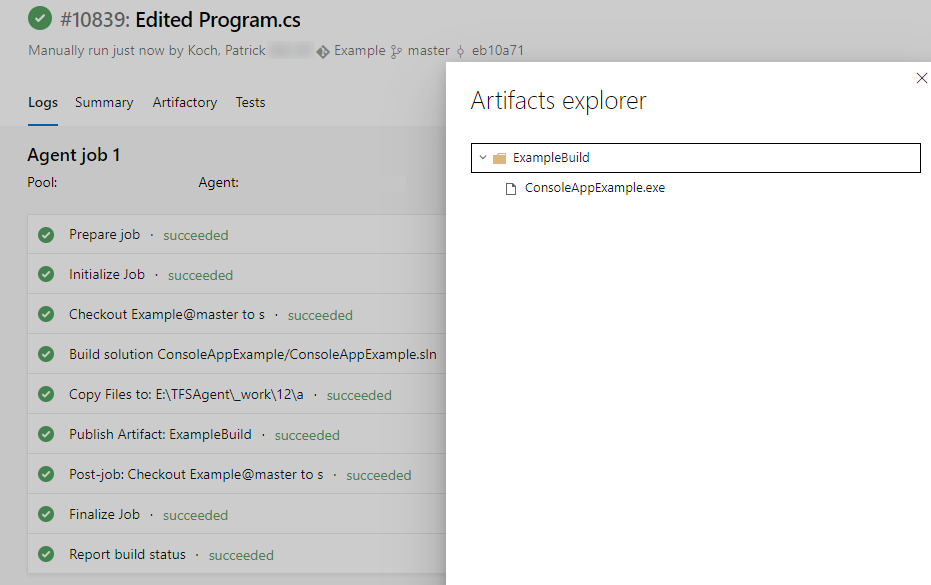
Triggering a Job and Result
After conducting a job for the Build Pipeline to generate the Artifacts, in that case the .exe-file, it can be downloaded:
YAML Code Snippet of the Build Pipeline
The yaml code shown below corresponds to the steps, implemted with the Classical-Editor.
pool:
  name: SomeAgentPoolName
  demands:
  - msbuild

steps:
- task: MSBuild@1
  displayName: 'Build solution ConsoleAppExample/ConsoleAppExample.sln'
  inputs:
    solution: ConsoleAppExample/ConsoleAppExample.sln
    msbuildVersion: 15.0
    msbuildArchitecture: x64
    msbuildArguments: '/p:Configuration=Debug /p:Platform="Any CPU"'

- task: CopyFiles@2
  displayName: 'Copy Files to: $(build.artifactstagingdirectory)'
  inputs:
    SourceFolder: ConsoleAppExample/ConsoleApp1/bin/Debug/net48
    Contents: ConsoleAppExample.exe
    TargetFolder: '$(build.artifactstagingdirectory)'

- task: PublishBuildArtifacts@1
  displayName: 'Publish Artifact: ExampleBuild'
  inputs:
    ArtifactName: ExampleBuild
2. Release Pipeline: Getting Artifacts as Input - aimed to conduct Deployment/Testing/…
You’ve finished your Build Pipeline and as a result, some Artifacts are provided as output. As already mentioned you’re of course not done, as you still didn’t deploy the Artifact at a Virtual Machine or Container, etc. to conduct some further steps to ensure the quality. Therefore, we’re going to implement a corresponding Release Pipeline, which will be linked with the Build Pipeline, which was explained within the previous sections above. The used Release Pipeline is simple and just contains one single Stage: each Stage can contain multiple actions. Stages can be linked and contain Deployment conditions.
For the Release Pipeline following steps will be implemented:
- Add an Artifact: As mentioned, the resulting .exe-file of the Build Pipeline will be added as Artifact to the Pipeline
- Agent Job Settings: Same as for the Build Pipeline: set a dedicated Agent pool for your pipeline and determine Demands to ensure that a proper Agent will be choosen, containing the mandatory requirements. Probably, that Agent won’t be equal to that one used for the Build Pipeline.
- Conduct a Batch Command: Just a very simple action will be implemented to finish the Release Pipeline: in that case, a Batch Script will be triggered to pass arguments to the .exe-file.
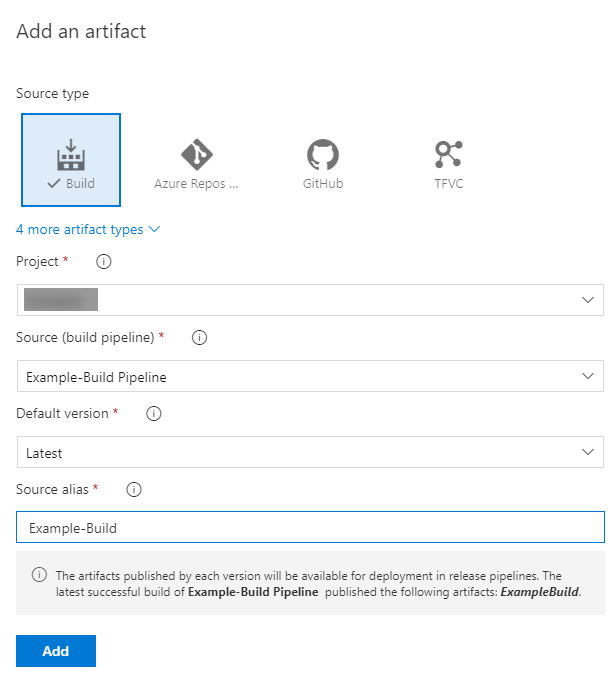
2.1 Add an Artifact
By adding the Artifact, which resulted from a Build Pipeline you’re also going to establish a link between the different pipelines: for that purpose, choose Build as Source type, select the Build Pipeline, which was explained in the previous sections and provide a Source alias: After triggering the Release Pipeline you’ll get a checked out directory, named according to the Source alias, containing the Artifacts.
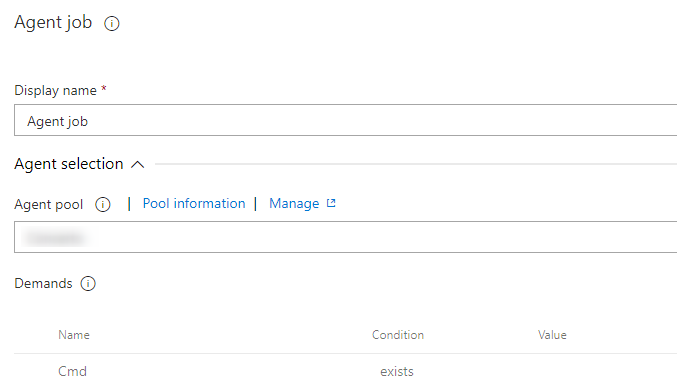
2.2 Agent Job Settings
Same advice as for the Build Pipeline: ensure that a proper Agent according to the prerequisites will be assigned to the conducted job: e.g.: when you would like to deploy a Java related application, ensure that the Agent contains a Java Runtime. In our case, triggering a Batch Script is sufficient.
2.3 Conduct a Batch Command
Finally, we’d like to perform an action - targeting our Artifact.

We keep it simple and just trigger our Artifact “ConsoleAppExample.exe” with a Batch Script Action, providing some dummy arguments:

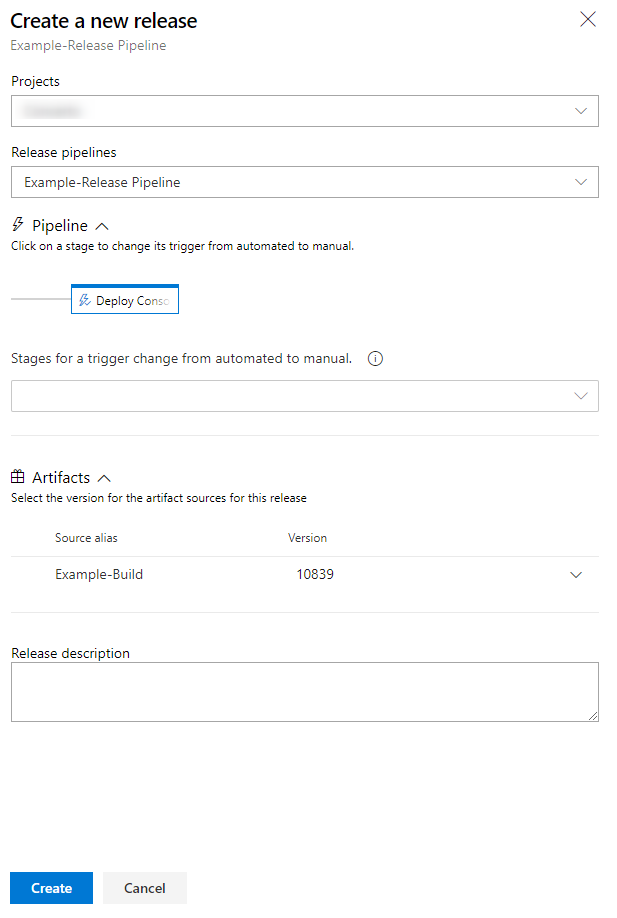
Triggering a Job and Result
Now it is time to conduct a new release: following dialogue appears, which reveals which Artifacts are going to be used for the job of the Release Pipeline. In the picture below you can observe that it’s about the “Example-Build” Artifact with the version “10839” - that’s the latest result and the same version, which we got after running a successfull build of the Build Pipeline.
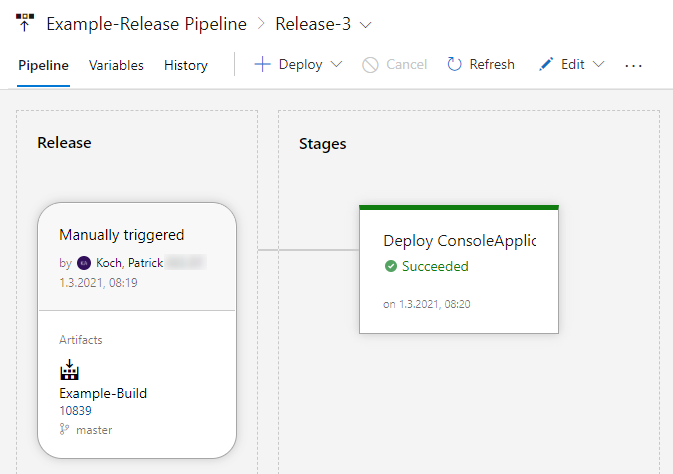
When the job is completed, the result should look like in the picture below: the Stage - in that case just consisting of the Batch Script Action:
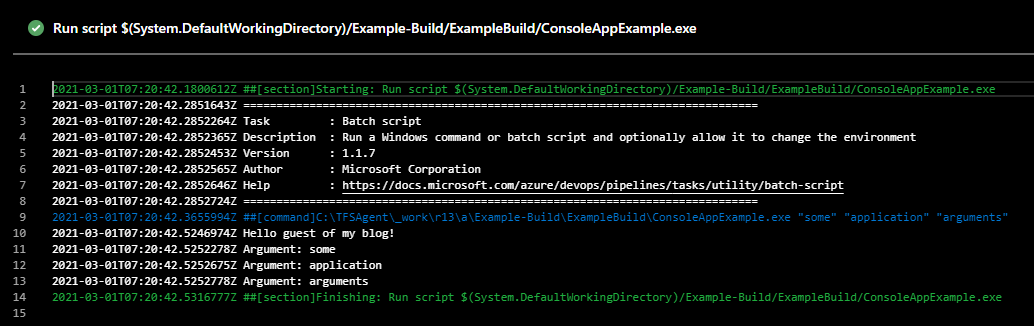
Navigating to the logs let you observe the used arguments:
YAML Code Snippet of the Release Pipeline
The yaml code shown below corresponds to the steps, implemented with the GUI-Editor.
steps:
- task: BatchScript@1
  displayName: 'Run script $(System.DefaultWorkingDirectory)/Example-Build/ExampleBuild/ConsoleAppExample.exe'
  inputs:
    filename: '$(System.DefaultWorkingDirectory)/Example-Build/ExampleBuild/ConsoleAppExample.exe'
    arguments: '"some" "application" "arguments" '
Conclusion
The Azure DevOps Server provides two different types of pipelines to perform build, deployment, testing and further actions. A Build Pipeline is used to generate Artifacts out of Source Code. A Release Pipeline consumes the Artifacts and conducts follow-up actions within a multi-staging system. It is best practice to establish a link between a Build Pipeline and the corresponding Release Pipeline.